The use of speedlights is a great way to create high impact photos, recently I’ve used speedlights for a few different shoots. The general set up I use involves 2 speedlights on stands controlled remotely with a Nikon SU800, this gives wireless infra red control, you still need line of site but off camera flash allows you to be really creative. Along side the 2 flash units I have a collection of Honl gels, they attach using honl Velcro straps, great pieces of kit allowing gels to be put on and taken of with speed. A bit of extra colour can really give the shot that wow factor. To set up the shot normally takes about 5 minutes, getting the flashes in the right position, visualizing the shot, I get the client in for a quick test shot and we’re good to go.
These first shots are of Sonny Wharton he is a professional DJ and the images from the shoot were for promotional use by him and his agent at Strong Hold Artists. We spent about 3 hours on a Sunday afternoon going to several locations in Shrewsbury and getting a varied collection of shots, we went to 3 different locations, under a railway bridge, the Shrewsbury column and a pedestrian subway, we got some great shots at each location.
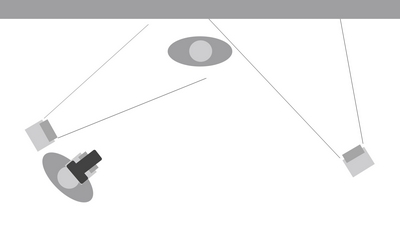
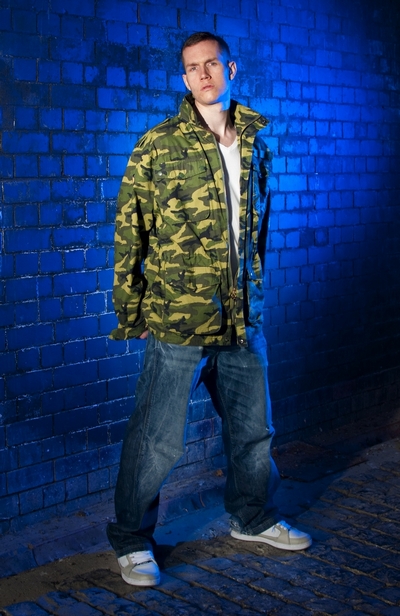
This first shot was under the railway bridge. I had an SB900 to my left set to 200mm, this will be the key light, the great thing about the new SB900 is you can zoom the flash up to 200mm this gives you a smaller area of light so you can really focus it in on your subject, by getting Sonny into position and angling the SB900 so it was pointing down his nose at 200mm I new it would hit him square on in the right place. The second flash a smaller SB600 I had over to the right, this would provide a backlight and by adding a blue honl filter it would give the image that extra punch. I zoomed the SB600 out to 100mm this would give a larger pool of light covering more of the wall, at the same time only a small amount will spill onto Sonny and what does will be over powered by the focused flash of light from the key light.

This is a diagram of how the flashes were set up.
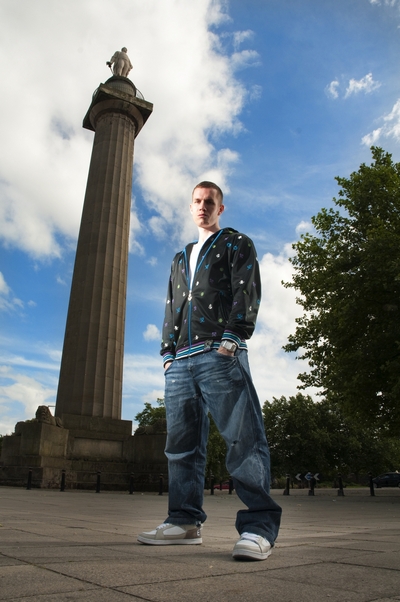
The next photo i selected from the days shots is this one of Sonny stood in front of the Column by the Shirehall in Shrewsbury.
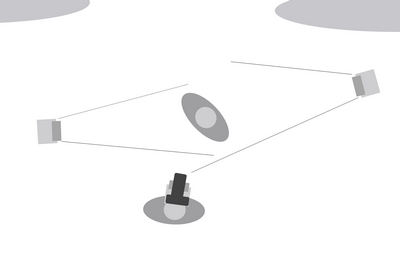
Again for this shot I used both flashes, the SB900 for the key light and SB600 providing the back light, I had my 18 – 70mm lens at 18mm and lay down on the floor with the camera on the floor, the wide angle of the lens and looking up from below I’m able to really play with the perspective of the column in the back ground, using the trees to the right and the column to frame sonny against the sky in the back ground. By having the backlight lined up behind Sonny it really picks him up and lifts him out of the photo, if the backlight wasn’t being used he would blend into the background allot more, I’ve even had a few people ask if I added him to the photo using Photoshop and No we were definitely there but that’s the impact you need, the subject of the photo should be what your eyes are drawn too.
A Sketch of the lighting setup we used at the Column.
I’m still learning all the time and I really enjoy these type of shoots as it gives me chance to practice and try out new things. Great sources to learn from are The Strobist a great blog that also has a massive Flickr group. My favourite however has to be the master of photography Damien Lovegrove, I have watched lots of his DVDs and enjoy reading the articles he writes for Photo Pro magazine, most of the new skills i pick up are from his tutoring whether its DVDs or reading. I’m also booked on a few of his courses over the coming months to really start to push myself on technically. Damien also has a great blog prophotonut.


